Thursday, August 4, 2016

I am alive ;-)

I completly forgotten about this blog. But Google somehow find me and put this blog in front of me.
Anyway, If Google want me to continue this blog then how can I dare to deny it :p

Let's blog again...

WeB Log => We Blog

Wednesday, May 26, 2010

Adding Sub-menu to main menu


**** This is GNOME-Specific ****
How to add the submenu to the Main menu in Ubuntu-9.04
(May be applicable to all the distribution)


I am writing this, in particular, for the wine submenu.
I install the MS-Office-w2k3 though wine on Ubuntu-9.04 and observed the following steps for the same.


1. Add the name of the sub-menu to the main menu by editing the file

/etc/xdg/menu/applications.menu or /etc/xdg/menu/applications-merged/wine.menu

The entry will go like this:

< menu >
< name >wine-Programs-MS-Office< /name >
< directory >wine-Programs-MS-Office.directory< /directory >
< include >
< catagory >Wine-Programs-MS-Office< /category >
< /include >
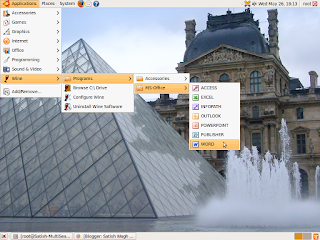
< /menu >


This will create a ready-to-add submenu named "MS-Office" in Applications -> wine -> Programs

2. This submenu is actually get added when we create the file "/usr/share/desktop-directories/wine-Programs-MS-Office.directory" and adding the following content to it:

[Desktop Entry]
Type=Directory
Name=MS-Office
Icon=folder


3. Now we need to add the item's to this submenu by creating one file per item in /usr/share/applications with the extension ".desktop"

Here is sample code for one of the file "wine-word.desktop"

Name=WORD
Comment=Microsoft's WORD Processor
Exec=wine "C:\Program Files\Microsoft Office\OFFICE11\WINWORD.EXE"
Terminal=false
Type=Application
Icon=msword
Categories=Wine-Programs-MS-Office;


In this file, name is name. Exec is the command to be get executed when we click on this item. And catagories is the place where this item is supposed to go.
This will use the icon specified by Icon and will find in /usr/share/pixmaps folder.


For all the item's, repeat last procedure.

Monday, April 26, 2010

Wifi for Linux

These steps will make your wifi-dongle work out-of-box.
These are the skeleton steps for the same:


1. Check the Wireless card is detected.
This can be done as
"lspci | grep -i wireless"
If the output shows the output, It means the wireless device is connected.

2. Make sure the module is installed for the same devie.
Check the name of module as "lsmod"

3. Else, if the module is already installed OR in kernel itself, then make sure
that module is properly detected by the device by looking in "dmesg"

4. Device need the module and firmware to make it run.
"dmesg" will show wheather the device find both of them.
Once it gots both then the device will it's start functionality after configuration.

5. Do the "ifconfig -a" or "iwconfig"
It will shows the wifi-device as "eth1" or "wifi0" or "wlan0".
it depends upon the underlying OS.

6. Now enable the wifi-device as
"ifconfig up"

7. Do the "iwlist scan" to see the available access points.

8. Configure the device for the intended AP as, ( sometime either command is suffice. )
"iwconfig essid "
"iwconfig ap "

9. If the AP is wep-encrypted then execute the command
"iwconfig key "

10. Ping the network for this device with command:
"ping -I "

Have a Happy networking....!!!

Friday, April 23, 2010

Authenticating Linux User by Window's AD Server

1. Install the samba with ADS Support.
This can be done while configuring the samba as
./configure --with-shared-modules=idmap_ad,idmap_rid
This will add support to the samba for the ADS
2. Set the primary DNS values of the underlying machine to the
IP Address of the AD Server
3. Hostname of the Client machine is set to as

e.g. 192.168.1.180 w2k3r2sp2.com mymachine
4. The time on both AD Server and the client should match.
This can be done by configuring the ntp on client pointing
to the AD Server.
5. Configuring smb.conf file as:

[global]
workgroup = W2K3R2SP2 --> WorkGroup Name
realm = W2K3R2SP2.COM --> AD Server's Domain Name
server string = Samba Server Version %v
security = ADS --> Security mode. It *must* be ADS
passdb backend = tdbsam
log file = /var/log/samba/log.%m
max log size = 50
idmap uid = 100-20000 --> UID of group user
idmap gid = 100-20000
template homedir = /home/%U --> User's HOME Directory.
template shell = /bin/bash --> User's Default SHELL
winbind use default domain = Yes
cups options = raw

[homes]
comment = Home Directories
read only = No
browseable = No

[printers]
comment = All Printers
path = /var/spool/samba
printable = Yes
browseable = No

6. Start the service smbd and winbindd
7. Test the setting by running the command:
net ads testjoin
8. Join the domain by executing:
net ads join -U administrator
9. The domain users and groups can be viewed as:
wbinfo -u
wbinfo -g
10. Now we can login to the linux machine either by "su" or loggin off and then login as a domain user.


Have a Happy Logging !!!